| Animations/ Texture Morphing |
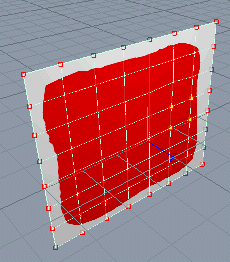
Texture MorphingTexture morphing is the process of animating a texture, or an object's material, over time. For example, creating a scene that includes a waterfall, or any type of moving water, would use texture morphing. You have most likely seen movies in which the head of a person suddenly transforms into the head of a terrible monster, or vice versa depending on the movie. Such effects, and more, can be created using texture morphing. Morphing the shape of a textureTutorial level: Medium Example project: 'tutorprojects/animation/textures/texture morphing' One way to morph a texture is to change its shape. Realsoft 3D allows you to edit texture control points, just the same way you would edit geometry control points. Since many useful and interesting effects can be achieved this way, let's explore how this is done. This tutorial involves creating a texture that is shaped as a circle and changing it into a rectangle. 1. Create an 8 x 8 NURBS rectangle. This is adequate for this exercise; however, you should note that the more control points the mesh has, the better control you have over texture deformations. 2. Select the mesh. The control bar now shows you the NURBS-specific tools. Click the 'Define UV' tool. This creates custom texture coordinates for the mesh that can be edited and animated. 3. Use the UVimage tool of the 'Materials' tool tab to create a blank texture for the mesh. Turn OpenGL on and use the 'Circle' 3D painting tool to paint a filled circle on the mesh.
You can also use your favorite painting program to create the image, and then attach it to the object using the property window's 'Col' tab. The next step is to deform the texture coordinates so that the circle turns to a rectangle. 4. Set animation recording on and move the time slider to the last frame. 5. Select the mesh and enter the edit mode. Select the control points whose texture coordinates you want to edit and activate the Move tool. Set the 'Target' option to the value 'Texture'.
6. Enter two points through the view window to define the movement of the control points. When moving the points, make sure you click the mouse over the actual mesh. Otherwise, the program will not be able to compute how much the texture should be moved on the surface. 7. Continue selecting points and moving them, if necessary, until you have reshaped the texture into a rectangle.
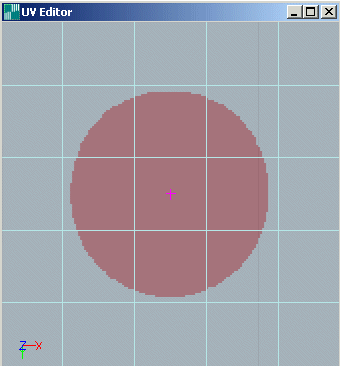
8.When you have finished modifying the necessary texture control points, turn off animation recording and play the animation. Using the UV EditorThe previous example showed how to directly edit texture object coordinates, and this technique works well for many situations. However, you also can view and edit texture coordinates in the UV Editor. You may find the UV Editor more useful for certain types of texture deformations or adjustments, or it may be that the editor is better suited to your way of viewing the texture editing process. Either way, here is how it is done. To use the UV editor to define texture deformations: 1. Open the editor by selecting 'Windows/UV Editor' from the main menu. When you select the mesh, the UV Editor shows you the texture as a backdrop image and renders the texture control points over it. 2. Move the time slider to a desired frame, set animation recording on and edit the control points. While editing texture coordinates through the UV Editor, view windows show you the result in real time. If OpenGL acceleration hardware is not installed, rendering of large textures may slow down the editing. To avoid this, use non-shaded rendering for the view window.
If you now move the time slider, you can see how the texture coordinates in the UV editor change with time.
Creating a waterfallTutorial level: Medium Example project: 'tutorprojects\animation\texture\waterfall' Let's move on to something more interesting. Next, we will create a simple waterfall animation where a texture that looks like falling water moves along a NURBS mesh. 1. Create a textured NURBS mesh that represents a waterfall, see the image below. You can also use the sample project file for this tutorial. Use the property window's 'Col/Texture Map' field to attach the image directly to the surface.
2. Activate animation recording and move the time slider to the last frame. 3. Select the mesh and activate the Move tool. Set the 'Target' option to 'Texture' in the control bar.
4. Now enter two points over the NURBS mesh to define a translation for the texture downward along the mesh. The texture animation is now ready. Turn off animation recording and move the time slider to see how the texture slides on the surface. In OpenGL rendering mode you can see how the texture moves in real time. You can also animate the position of the texture through the property window. In the 'Col' tab you can see four texture transformation fields which allow you to translate, scale, rotate and skew the texture using a numerical interface.
|
 |
 |


